How To Setup a Kubernetes Cluster Using Debian or Ubuntu
Overview:
This guide shows how to create a three-node, single-control-plane Kubernetes cluster that conforms to best practices in Debian or Ubuntu Linux. For this guide, we will use Kubernetes version 1.28 (the latest release at the time of writing).
Page Contents
What is Kubernetes?
Kubernetes (known as K8s) is the most popular open-source and enterprise-grade container orchestration system. It automatically deploys, scales, and manages containerized workloads or applications. For easy management and discovery of services, Kubernetes groups containers that make up an application into logical units.
Importantly, Kubernetes uses a container runtime to run containers effectively. A container runtime is responsible for managing the execution and lifecycle of containers within the Kubernetes environment (particularly on worker nodes).
Kubernetes supports container runtimes such as containerd (usually installed together with Docker), CRI-O, and any other implementation of the Kubernetes CRI (Container Runtime Interface). As of version 1.28, Kubernetes requires that you use a runtime that conforms with the CRI.
The following are Kubernetes’ key features:
- Supports automatic rollouts and rollbacks,
- Supports service discovery and load balancing,
- Supports secret and configuration management,
- Supports horizontal scaling,
- Supports self-healing (restarts containers that fail, replaces and reschedules containers when a worked node fails, and more),
- Also supports batch execution,
- Supports automatic bin packing,
- Supports allocation of IPv4 and IPv6 dual-stack addresses to Pods and services, and
- It’s highly extensible.
Prerequisites:
- 3 Nodes with Debian or Ubuntu Linux installed,
- Full network connectivity between all nodes in the cluster (public or private network is fine),
- Disable swap partitions on all nodes.
- 2 GB or more of RAM per node (anything less will leave little room for your apps),
- 2 CPUs or more,
- Unique hostname, MAC address, and product_uuid for every node, and
- Kubernetes ports should be open in the node firewall.
If you have a firewall running on the nodes, ensure that the following TCP ports, used by Kubernetes control plane components are open on the control plane:
- Port 6443 – Kubernetes API server
- Ports 2379-2380 – etcd server client API
- Port 10250 – Kubelet API
- Port 10259 – kube-scheduler
- Port 10257 – kube-controller manager
Also, ensure that the following TCP ports are open on the Kubernetes worker nodes:
- Port 10250 – Kubelet API
- Ports 30000-32767 – NodePort Services
Step 1: Disable Swap Space/Partition on All Nodes
By default, Kubernetes does not support the use of a swap area or partition. Therefore, you must disable swap on all the nodes. The following command will disable the swap partition or area temporarily on all the nodes:
#swapoff
OR
$sudo swapoff -a
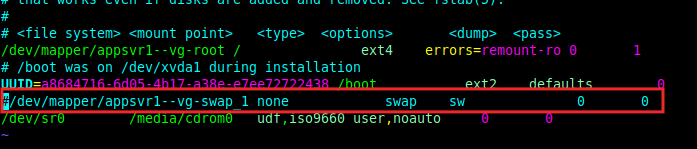
To disable swap permanently, comment out the configuration for swap partition mount in the /etc/fstab file as shown in the following screenshot.
Step 2: Installing Docker and Containerd as Container Runtimes (on all Nodes)
Next, run the following commands in the order they appear to install Docker and Containerd packages on all the nodes:
#apt-get -y update
#apt-get -y install ca-certificates curl gnupg lsb-release
#mkdir -m 0755 -p /etc/apt/keyrings
#curl -fsSL https://download.docker.com/linux/debian/gpg | gpg --dearmor -o /etc/apt/keyrings/docker.gpg
#echo   "deb [arch=$(dpkg --print-architecture) signed-by=/etc/apt/keyrings/docker.gpg] https://download.docker.com/linux/debian (lsb_release -cs) stable" | tee /etc/apt/sources.list.d/docker.list > /dev/null
#apt-get -y update
#chmod a+r /etc/apt/keyrings/docker.gpg
#apt-get -y update
#apt-get -y install docker-ce docker-ce-cli containerd.io docker-buildx-plugin docker-compose-plugin
In Kubernetes version v1.20 and onwards, support for Docker (implemented via Dockershim) was removed. And from v1.24 onwards, you have to either use one of the other supported runtimes (such as containerd or CRI-O).
Now that the Containerd package has been installed successfully, enable the Container Runtime Interface (CRI) plugin in the Containerd configuration file /etc/containerd/config.toml. Look for the following line, which disables it, and comment it out:
disabled_plugins = ["cri"]

Then restart the Containerd service with the following systemctl command:
#systemctl restart containerd.service
Step 3: Installing Kubernetes Tools: kubelet, kubeadm, and kubectl(on all Nodes)
In this step, you will install the following Kubernetes command-line tools on all the nodes:
kubeadm: the command to bootstrap the K8s cluster.kubelet: the component that runs on all of the nodes in your cluster and performs actions such as starting pods and containers.kubectl: the command-line utility used for interacting with the K8s cluster.
Now run the following commands in the order they appear to install the required Kubernetes packages on all the nodes:
#apt-get update
#apt-get install -y apt-transport-https ca-certificates curl
#curl -fsSL https://pkgs.k8s.io/core:/stable:/v1.28/deb/Release.key | gpg --dearmor -o /etc/apt/keyrings/kubernetes-apt-keyring.gpg
#echo 'deb [signed-by=/etc/apt/keyrings/kubernetes-apt-keyring.gpg] https://pkgs.k8s.io/core:/stable:/v1.28/deb/ /' | tee /etc/apt/sources.list.d/kubernetes.list
#apt-get update
#apt-get install -y kubelet kubeadm kubectl
#apt-mark hold kubelet kubeadm kubectl
Step 4: Creating a Kubernetes Cluster (Initializing the Control Plan Using Kubeadm)
The first thing to do to create a Kubernetes cluster is to initialize the control plane node (the machine where the control plane components run, including etcd (the cluster database)) and the API server (which the kubectl command-line tool communicates with to administer the cluster).
So, select one of your nodes and run the following kubeadm command on it:
# kubeadm init
You will see command output similar to the one below.
[init] Using Kubernetes version: v1.28.2
[preflight] Running pre-flight checks
	[WARNING SystemVerification]: missing optional cgroups: hugetlb
[preflight] Pulling images required for setting up a Kubernetes cluster
[preflight] This might take a minute or two, depending on the speed of your internet connection
[preflight] You can also perform this action in beforehand using 'kubeadm config images pull'
W1002 07:31:54.225347    9070 checks.go:835] detected that the sandbox image "registry.k8s.io/pause:3.6" of the container runtime is inconsistent with that used by kubeadm. It is recommended that using "registry.k8s.io/pause:3.9" as the CRI sandbox image.
[certs] Using certificateDir folder "/etc/kubernetes/pki"
[certs] Generating "ca" certificate and key
[certs] Generating "apiserver" certificate and key
[certs] apiserver serving cert is signed for DNS names [k8s-node1 kubernetes kubernetes.default kubernetes.default.svc kubernetes.default.svc.cluster.local] and IPs [10.96.0.1 10.10.50.36]
[certs] Generating "apiserver-kubelet-client" certificate and key
[certs] Generating "front-proxy-ca" certificate and key
[certs] Generating "front-proxy-client" certificate and key
[certs] Generating "etcd/ca" certificate and key
[certs] Generating "etcd/server" certificate and key
[certs] etcd/server serving cert is signed for DNS names [k8s-node1 localhost] and IPs [10.10.50.36 127.0.0.1 ::1]
[certs] Generating "etcd/peer" certificate and key
[certs] etcd/peer serving cert is signed for DNS names [k8s-node1 localhost] and IPs [10.10.50.36 127.0.0.1 ::1]
[certs] Generating "etcd/healthcheck-client" certificate and key
[certs] Generating "apiserver-etcd-client" certificate and key
[certs] Generating "sa" key and public key
[kubeconfig] Using kubeconfig folder "/etc/kubernetes"
[kubeconfig] Writing "admin.conf" kubeconfig file
[kubeconfig] Writing "kubelet.conf" kubeconfig file
[kubeconfig] Writing "controller-manager.conf" kubeconfig file
[kubeconfig] Writing "scheduler.conf" kubeconfig file
[etcd] Creating static Pod manifest for local etcd in "/etc/kubernetes/manifests"
[control-plane] Using manifest folder "/etc/kubernetes/manifests"
[control-plane] Creating static Pod manifest for "kube-apiserver"
[control-plane] Creating static Pod manifest for "kube-controller-manager"
[control-plane] Creating static Pod manifest for "kube-scheduler"
[kubelet-start] Writing kubelet environment file with flags to file "/var/lib/kubelet/kubeadm-flags.env"
[kubelet-start] Writing kubelet configuration to file "/var/lib/kubelet/config.yaml"
[kubelet-start] Starting the kubelet
[wait-control-plane] Waiting for the kubelet to boot up the control plane as static Pods from directory "/etc/kubernetes/manifests". This can take up to 4m0s
[apiclient] All control plane components are healthy after 13.004231 seconds
[upload-config] Storing the configuration used in ConfigMap "kubeadm-config" in the "kube-system" Namespace
[kubelet] Creating a ConfigMap "kubelet-config" in namespace kube-system with the configuration for the kubelets in the cluster
[upload-certs] Skipping phase. Please see --upload-certs
[mark-control-plane] Marking the node k8s-node1 as control-plane by adding the labels: [node-role.kubernetes.io/control-plane node.kubernetes.io/exclude-from-external-load-balancers]
[mark-control-plane] Marking the node k8s-node1 as control-plane by adding the taints [node-role.kubernetes.io/control-plane:NoSchedule]
[bootstrap-token] Using token: u9gwom.iypwm2fo4ylerrdc
[bootstrap-token] Configuring bootstrap tokens, cluster-info ConfigMap, RBAC Roles
[bootstrap-token] Configured RBAC rules to allow Node Bootstrap tokens to get nodes
[bootstrap-token] Configured RBAC rules to allow Node Bootstrap tokens to post CSRs in order for nodes to get long term certificate credentials
[bootstrap-token] Configured RBAC rules to allow the csrapprover controller automatically approve CSRs from a Node Bootstrap Token
[bootstrap-token] Configured RBAC rules to allow certificate rotation for all node client certificates in the cluster
[bootstrap-token] Creating the "cluster-info" ConfigMap in the "kube-public" namespace
[kubelet-finalize] Updating "/etc/kubernetes/kubelet.conf" to point to a rotatable kubelet client certificate and key
[addons] Applied essential addon: CoreDNS
[addons] Applied essential addon: kube-proxy

Your Kubernetes control-plane has initialized successfully!

To start using your cluster, you need to run the following as a regular user:

  mkdir -p $HOME/.kube
  sudo cp -i /etc/kubernetes/admin.conf $HOME/.kube/config
  sudo chown $(id -u):$(id -g) $HOME/.kube/config

Alternatively, if you are the root user, you can run:

  export KUBECONFIG=/etc/kubernetes/admin.conf

You should now deploy a pod network to the cluster.
Run "kubectl apply -f [podnetwork].yaml" with one of the options listed at:
  https://kubernetes.io/docs/concepts/cluster-administration/addons/

Then you can join any number of worker nodes by running the following on each as root:

kubeadm join 10.10.50.36:6443 --token u9gwom.iypwm2fo4ylerrdc --discovery-token-ca-cert-hash sha256:e04258f4284043c8fde1c60b7a88ff0a23a88b6d34537ac350f3351d730e47dc
In the output of the previous command, 10.10.50.36 is the IP address of the control plane node. It will be used in the join command to be run on the worker nodes as shown later on in this guide.
Optional: Setup a Regular User Account for Managing K8s Cluster
On the control plane node, run the following commands to create a regular user account that you can use to manage the Kubernetes cluster and set a password for it(remember to set a secure password). Also, add the user to the sudo group as follows:
#useradd -m -s /bin/bash k8sadmin
#passwd k8sadmin
#usermod -aG sudo k8sadmin
Then switch to the regular user account you have just created and run the following commands to set the required Kubernetes cluster configuration files for managing the cluster as the regular user:
#su - k8sadmin
$mkdir -p $HOME/.kube
$sudo cp -i /etc/kubernetes/admin.conf $HOME/.kube/config
$sudo chown $(id -u):$(id -g) $HOME/.kube/config
Step 5: Installing a Pod Network Add-on
Now deploy a CNI(Container Network Interface) based Pod network add-on to enable Pods in the cluster to communicate with each other. Not that the Cluster DNS (CoreDNS) will not start up before a network is installed. For this guide, we will use the Weave Net.
Note: Before installing Weave Net, ensure that you have opened the following ports in the firewall of all the cluster nodes: TCP 6783 and UDP 6783/6784.
Then issue the following command to deploy Weave Net in your cluster:
$kubectl apply -f https://github.com/weaveworks/weave/releases/download/v2.8.1/weave-daemonset-k8s.yaml

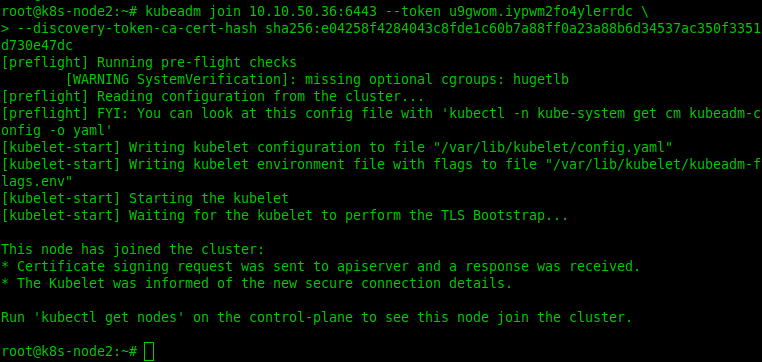
Step 6: Add Worker Node to K8s Cluster
Next, run the following command to add worker nodes to your Kubernetes cluster:
#kubeadm join 10.10.50.103:6443 --token 8gk1qc.5ujbhjnefjqpm914 --discovery-token-ca-cert-hash sha256:73ca8aec47f16eac5b5b10c99838276dda3d64d71c4aa76eae7adcef00ca6a02
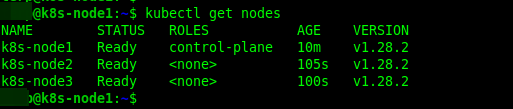
Step 7: Check Nodes in K8s Cluster
Once you have added worker nodes, you can check all the nodes in the cluster by running this kubectl command on the control plane:
$kubectl get nodes
Conclusion
Congratulations! You have successfully created a single control-plane Kubernetes cluster that conforms to best practices, in Debian or Ubuntu Linux. For more information see the Kubernetes documentation. For more setup options such as IPv4 forwarding and letting iptables see bridged traffic, for a container runtime, see this page in the documentation.