How to Install and Use WP-CLI to Manage WordPress Installation(s)
Overview:
This guide shows how to install and use WP-CLI for managing your WordPress installations on a Linux system.
Page Contents
What is WP-CLI?
WP-CLI (short for WordPress Command Line Interface) is the official command-line tool for interacting with and administering WordPress installations. WP-CLI manages your WordPress installation via the wp-config.php configuration file.
Traditionally, the only way to manage a WordPress installation has been via the administrator portal or dashboard. But with WP-CLI, you can perform various tasks, such as updating plugins, configuring multisite setups, and more.
What can you do with WP-CLI?
- Plugin management: Use the command line to install, activate, deactivate, update, and delete plugins.
- Theme management: Use the terminal to install, activate, and switch between themes.
- Core updates: With a single command, update the WordPress core software to the most recent version.
- User management: Create, delete, and manage WordPress users.
- Database operations: Import, export, and manage the WordPress database.
- Site maintenance: Perform various maintenance tasks such as cache clearing, rewriting permalinks, etc.
- Create articles, pages, and other content directly from the command line.
Requirements for Installing and Using WP-CLI
- UNIX-based operating systems such as a Linux distribution,
- PHP 5.6 or later
- WordPress 3.7 or later
Installing WP-CLI in Linux
If your system meets the requirements, go ahead to download the wp-cli.phar file using wget or curl command line tools, like this:
$wget https://raw.githubusercontent.com/wp-cli/builds/gh-pages/phar/wp-cli.phar
OR
$curl -O https://raw.githubusercontent.com/wp-cli/builds/gh-pages/phar/wp-cli.phar

Next, you need to set up WP-CLI locally on your system. First, you need to make it executable. Then move it to a location that allows you to run it from any directory(via the $PATH). You can move it to the /usr/local/bin/ directory, as follows:
$chmod +x wp-cli.phar
$sudo mv wp-cli.phar /usr/local/bin/wp

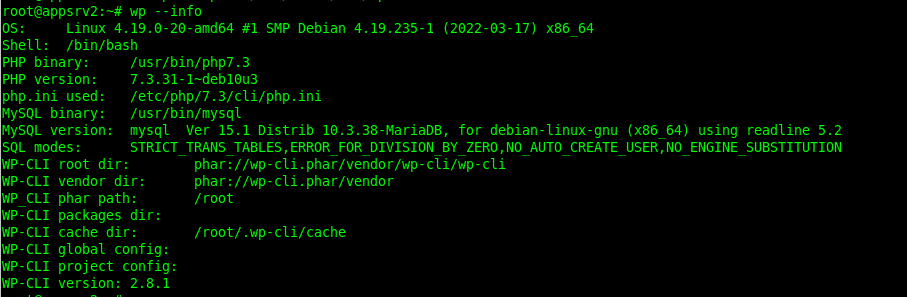
Next, you need to verify that the WP-CLI setup is working fine by running the following command. The command output should display information about your OS, shell, PHP binary and version, MySQL/MariaDB binary and version, and the WP-CLI configuration parameters as shown in the following screenshot:
$wp --info
Enable Tab Completion in WP-CLI
WP-CLI has a Bash and ZSH tab completion script. To enable tab completion, simply download wp-completion.bash, like this:
$mkdir scripts
$wget https://raw.githubusercontent.com/wp-cli/wp-cli/v2.8.1/utils/wp-completion.bash
$vim  ~/.bash_profile
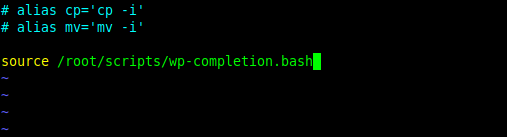
Then source it from ~/.bash_profile or ~/.bashrc file:
source /FULL/PATH/TO/wp-completion.bash
Save the file and close it. Afterwards, run the following command to complete the setup:
$source ~/.bash_profile
OR
$source ~/.bash_profile
Use WP-CLI to Manage a WordPress Installation
To administer a WordPress installation using WP-CLI, move into the root directory of the WordPress installation or use the –path=’/path/to/wordpress’ to specify it.
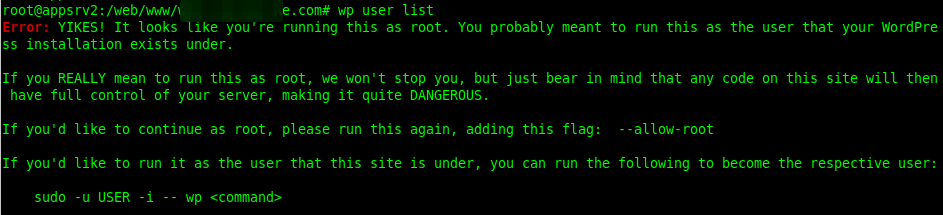
$cd /web/www/example.com/
$wp user list
Note: WP-CLI doesn’t support usage by the root user by default for security reasons. It will throw the error shown in the following screenshot. To run it as root, use the –allow-root option.
The following are some WP-CLI usage examples. The first one shows a list of all users created in the current WordPress installation:
$wp user list --allow-root

To update a users password, simply use the –user_pass flag like this:
$wp user update --user_pass=securepassword --allow-root

To install a plugin, for example, hello, run the following command. Replace “hello” with the name of the plugin you would like to install:
$wp plugin get hello  		#get information about a plugin
$wp plugin install hello
To activate a plugin, run the following command. Replace “hello” with the name of the plugin you would like to activate:
$wp plugin activate hello
You can also activate a plugin immediately after installing it using the –activate option, like this:
$wp plugin install hello --activate
To update all plugins, use the following command:
$wp plugin update --all
To get a list of all installed plugins, run this command:
$wp plugin list
To deactivate and delete a plugin, use the following commands respectively:
$wp plugin deactivate hello
$wp plugin delete hello
How to Update WP-CLI
To update wp-cli, you can either run the following command or simply install it again:
$wp cli update
Conclusion
WP-CLI allows you to control WordPress from the command line. It provides a command-line interface for numerous operations available in the WordPress admin. In this post, we showed how to install and use WP-CLI in Linux. Use the comment form below to share your views or questions about this guide.
For more information and usage examples, visit the WP-CLI official website: https://wp-cli.org/.