Here is the Best Trick to Install Ubuntu Packages in Linux Mint
Overview:
This guide explains the best way to install Ubuntu Linux packages in Linux Mint and other Ubuntu derivatives.
Page Contents
What you need to know
With millions of users, Linux Mint is one of the most popular desktop Linux distributions. It is my preferred desktop Linux distribution, and I now use it on a regular basis after transitioning from Ubuntu and openSUSE.
Importantly, Linux Mint is based on Ubuntu, and you can install Ubuntu packages, but it is not always straightforward. Why? Because package repositories in most cases make use of Ubuntu code names in repository setups, this may cause issues when a Linux Mint user configures the Ubuntu-based repositories on their Linux Mint machine.
So, what is the solution? Below, I have explained a simple trick to easily install Ubuntu packages in Linux Mint.
Example of How to Install Ubuntu Packages in Linux Mint
To demonstrate this trick, I will install the NGINX package from the official APT repository for Ubuntu. I will run the following commands provided by the NGINX package maintainers to add the official repository to my machine. Note that you will normally find such instructions on the official website of the package you are trying to install.
The first command is used to install the required packages before setting up the APT repository:
$sudo apt install curl gnupg2 ca-certificates lsb-release ubuntu-keyring
The next command downloads the NGINX package signing key and verifies it:
$curl https://nginx.org/keys/nginx_signing.key | gpg --dearmor | sudo tee /usr/share/keyrings/nginx-archive-keyring.gpg >/dev/null
$gpg --dry-run --quiet --no-keyring --import --import-options import-show /usr/share/keyrings/nginx-archive-keyring.gpg
The next command installs the repository configuration as /etc/apt/sources.list.d/nginx.list, on the local computer. Within this command, there is another command, “lsb_release -cs” which is used to determine the code name of the Ubuntu version.
$echo "deb [signed-by=/usr/share/keyrings/nginx-archive-keyring.gpg] http://nginx.org/packages/ubuntu `lsb_release -cs` nginx" | sudo tee /etc/apt/sources.list.d/nginx.list
But because the distribution is Linux Mint, the code name retrieved and stored in the repository configuration file will be for Linux Mint. For example:
$ lsb_release -cs

In this case, you need to find the corresponding codename for Ubuntu. The following command can help you achieve this:
$cat /etc/os-release
At the end of the output of the command, you will see the variable “UBUNTU_CODENAME=focal“ as highlighted in the following screenshot.
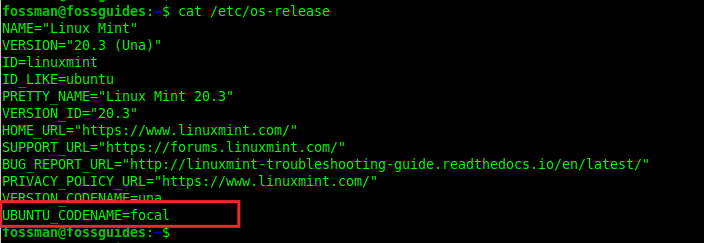
From the output of the previous command, the Linux Mint code name is “una” and the Ubuntu codename is “focal”. So open the NGINX repository configuration file using your favorite text editor, like this:
$sudo vim /etc/apt/sources.list.d/nginx.list
Replace the string una with “focal” as shown in the following screenshot.

Next, set up repository pinning to prefer the official packages over distribution-provided ones and run this command. For other packages, the command will be different:
$echo -e "Package: *\nPin: origin nginx.org\nPin: release o=nginx\nPin-Priority: 900\n" | sudo tee /etc/apt/preferences.d/99nginx
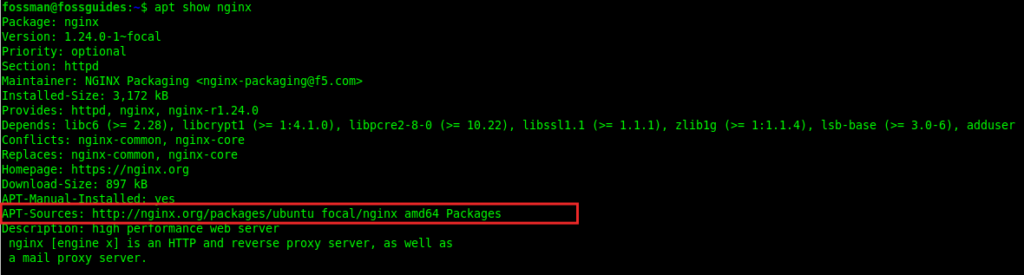
Now, when I try to view information about the NGINX package, in the details, the APT source should point to the official repository, as highlighted in the following screenshot:
$apt show nginx
Last but not least, refresh your local package index to include packages from the just-added repository and install the NGINX package:
$sudo apt update && sudo apt install nginx
Conclusion
That’s how I normally install Ubuntu packages in Linux Mint. If you have any questions, post them via the feedback form below.