How To Protect NGINX Using Fail2Ban on Debian/Ubuntu
Overview:
This guide shows how to ban IP addresses repeatedly causing certain HTTP errors in NGINX access log files, using Fail2Ban.
Page Contents
Problem
Recently, I saw many 403 HTTP errors due to requests from a specific IP address in my NGINX access log files. Below, I have explained how I used Fail2Ban to ban such IP addresses from accessing my NGINX web server.
Fail2Ban is a cool security software for protecting servers and services or applications running in them against failed login attempts. It is free open-source and designed to run contentiously in the background (daemon) to scan defined log files and ban IP addresses that cause multiple authentication errors.
Fail2Ban is an intrusion prevention software that is most often used to reduce the rate of incorrect authentication attempts. But it can also be used to prevent incorrect access to server resources. Generally, it can be configured to monitor and protect any service that writes login or resource access attempts to a log file.
Install Fail2Ban Package in Debian/Ubuntu
First, you need to install the fail2ban package in the server where NGINX is running, using the following apt command:
#apt install fail2ban
Configure a Fail2Ban Jail for NGINX
Next, you need to enable a fail2ban jail to protect the NGINX service. Run the following command to open a new file /etc/fail2ban/jail.d/nginx-4xx.conf:
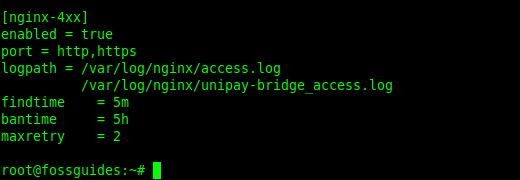
#vim /etc/fail2ban/jail.d/nginx-4xx.conf
Copy and paste the following configuration into it.
[nginx-4xx]
enabled = true
port = http,https
logpath = /var/log/nginx/access.log
          /var/log/nginx/myapp_access.log
findtime    = 5m
bantime     = 5h
maxretry    = 2
Let’s briefly describe the configuration directives in this configuration:
- ports – ports to be banned.
- logpath – path to the log files. You can specify multiple log files.
- findtime – a host is banned if it has generated “maxretry” during the last “findtime” seconds.
- bantime – is the number of seconds that a host is banned.
- maxretry – is the number of failures before a host gets banned.
Next, you need to create the filter to be used by Fail2Ban specifying how to detect request failures in the NGINX access log file defined in the jail above:
#vim /etc/fail2ban/filter.d/nginx-4xx.conf
Copy and paste the config below in the file:
failregex = ^<HOST>.*"(GET|POST|PUT).*" (403|404) .*$
ignoreregex =

In the above config, the failregex expression allows Fail2Ban to filter IP addresses with failed requests that have resulted in the 404, 444, or 403 error, with HTTP methods GET, POST, and PUT.
Next, you need to apply the recent changes to the Fail2Ban configuration by restarting the fail2ban service using the systemctl command below:
#systemctl restart fail2ban
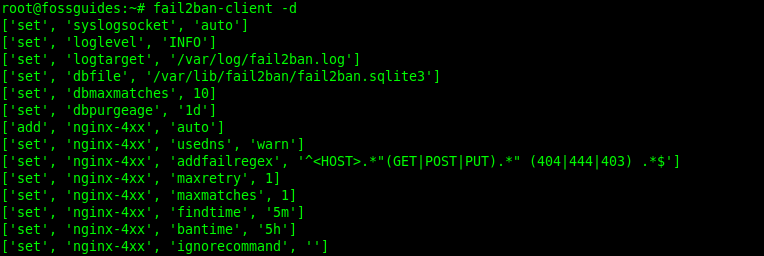
To get a dump of your current configuration (all the parameters that fail2ban loads on startup), issue the following command:
#fail2ban-client -d
To enable more verbose output, use these commands:
#fail2ban-client -vd
#fail2ban-client -vvd
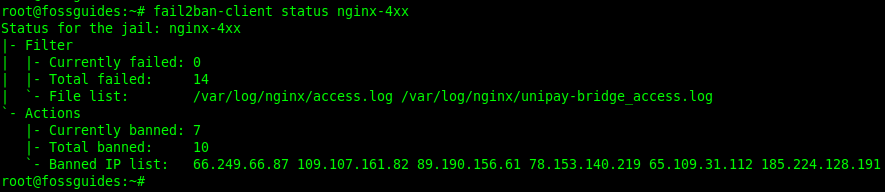
To check the status of a jail such as nginx-4xx, issue the command below:
#fail2ban-client status nginx-4xx
To unban an IP address, use the command below, and replace 10.20.20.58 with the IP address:
#fail2ban-client set nginx-4xx unbanip 10.20.20.58
Conclusion
That’s all I prepared in this guide about protecting NGINX using Fail2Ban on Debian/Ubuntu servers. To share your thoughts about this guide or topic, the comment section is right below, use it.
Reference:
1. https://gist.github.com/AysadKozanoglu/1335735272fb3b00a03bd3eea22af818
2. https://github.com/fail2ban/fail2ban