How To Dockerize a React Application for Production Deployment
Overview:
This guide shows how to containerize a React application in Docker (a.k.a. Dockerize) for production deployment.
Page Contents
Why You Should Dockerize Your React Application
There are various advantages to Dockerizing your application. Still, the most important thing is that it allows you to package or bundle your application code along with all its dependencies, allowing you to execute it on any platform supporting Docker. This eliminates the need to install dependencies whenever you wish to execute your application in a different environment.
This guide assumes that:
- you already have a working React application,
- that you have configured your application for production by making the necessary changes in the.env file,
- that all static files, such as favicons and logos, have been added in the appropriate locations in the application code,
- and that you have done other necessary things.
Create a Dockerfile in the Root of the Application
A Dockerfile is a text file that contains all of the commands that will be executed by the Docker engine to create an image. My Dockerfile instructions are below. It is divided into two sections: the first allows you to build the React application, and the second configures NGINX as a reverse proxy for serving static React files. To add a comment to a Docker file, use the # symbol.
Remember to use the correct Node.js version and image required by your application. You can search for the image tag on Docker Hub. For this guide, we will use Nodejs v14.21.
#Section to build React application
FROM node:14.21-alpine3.16 as react_app
WORKDIR /app
COPY ./package.json ./
RUN npm install
COPY . .
RUN npm run build

#Section to setup NGINX reverse proxy for serving React files
FROM nginx:1.23.1-alpine
COPY ./nginx/default.conf /etc/nginx/conf.d/default.conf
COPY --from=react_app /app/build /usr/share/nginx/html
EXPOSE 80
Let me now break down the above Dockerfile instructions:
- #Section to build React application – this is a comment
- FROM node:14.21-alpine3.16 as react_app – this instruction will initialize a new build stage and set the base image. Here, Nodejs v14.21 installed in Alpine (a lightweight Linux distribution) is used as the base image. The resulting output of this build stage is packaged as react_app, which is a dependency for the NGINX build stage.
- WORKDIR /app – this instruction will set /app as the current working directory in the build stage context.
- COPY ./package.json ./ – this will copy the package.json file from the local application directory into the current working directory(/app),
- RUN npm install – this instruction will run the “npm install” command to install the application’s dependencies defined in the package.json file,
- COPY . . – this instruction will copy all files and directories in the local directory ( except those defined in the .dockerignore file ) to the current working directory in the build stage.
- RUN npm run build – this instruction will run the “npm run build” command to build the react app within the Docker build stage,
- #Section to setup NGINX reverse proxy for serving React files – this is also a comment,
- FROM nginx:1.23.1-alpine – this instruction will pull and use the NGINX v1.23 image as the base image for the new build stage.
- COPY ./nginx/default.conf /etc/nginx/conf.d/default.conf – this will copy the NGINX configuration file into the image.
- COPY –from=build /app/build /usr/share/nginx/html – this instruction will tell Docker to copy the content of the build folder created from the previous stage(stored in /app/build) into the /usr/share/nginx/html so that NGINX can serve the static react files once the container is running.
- EXPOSE 80 – this will tell Docker to expose port 80 for NGINX to process requests to the react app, once the container is successfully running.
Create NGINX Directory and Configuration File
NGINX is a widely used HTTP server and reverse proxy software, well known for serving static and index files. Now, create an NGINX directory within the root of your application. Then create a configuration file called default.conf in it.
$mkdir  nginx
$vim nginx/default.conf
Copy and paste the following code into the default.conf configuration file:
server {
	listen 80;
	root /usr/share/nginx/html;
	index index.html;
	location / {
		try_files $uri $uri/ /index.html;
	}
}
Save the file and close it.
Exclude Files and Directories Using .dockerignore File
To exclude files not relevant to the Docker image build, without restructuring your source repository, use a .dockerignorefile. When you invoke Docker to build your image, the build client looks for a file named .dockerignore in the current directory directory of the context. Also, store the .dockerignore file in the root of your application:
$vim .dockerignore
Add all files and directories to exclude, in it. Note that .dockerignore supports exclusion patterns similar to .gitignore files.
.git
.DS_Store
Dockerfile
docker-compose.yml
build
node_modules
Save the file and close it.
Build Your Docker Image
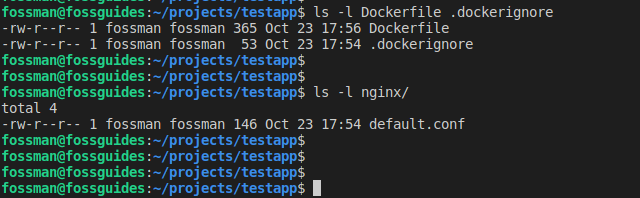
Before we proceed, ensure that you have all the required files described above. You can check using the ls command, as follows:
$ls -l Dockerfile .dockerignore
$ ls -l nginx/
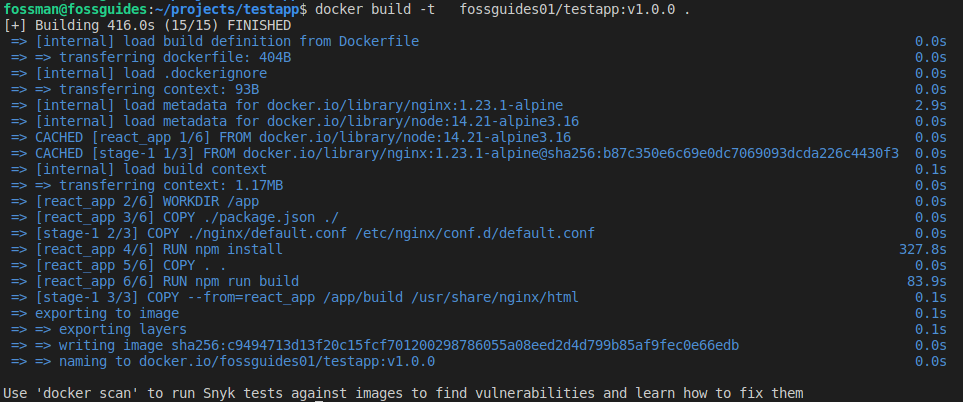
Now you can build your Docker image by running this command where the -t option specifies a tag for the image (fossguides/testapp:v1.0.0). Note that the tag in this example is of the format username/repository: tag which actually exists on Docker Hub.
$docker build -t fossguides01/testapp:v1.0.0 .
Upload Docker Image to a Registry e.g Docker Hub
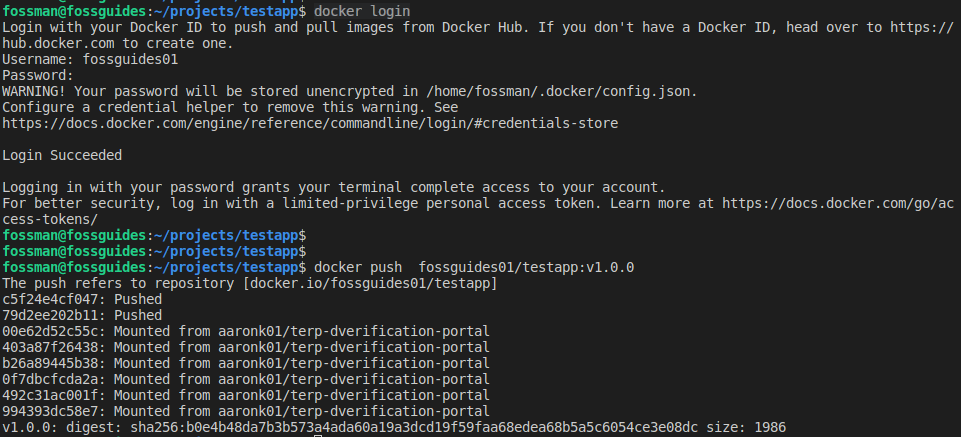
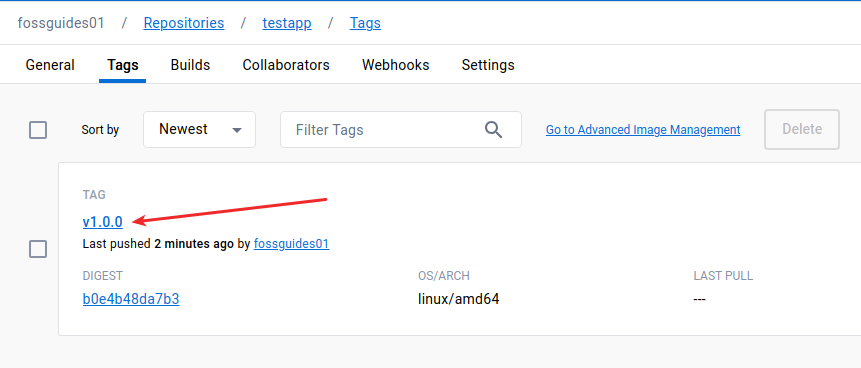
Now log into Docker Hub from the terminal and push your Docker image to your repository. As mentioned above, the account and repository fossguides01/testapp exist on Docker Hub.
$docker login
$docker push  fossguides01/testapp:v1.0.0
When I check the Docker Hub repository, under tags, I can see a new image as shown in the following screenshot.
Final Remarks
Congratulations! You have just containerized your react application using Docker ready for deployment in a production environment. If you encounter any errors or have questions or general comments, reach me via the feedback form below.
Reference: https://docs.docker.com/engine/reference/builder/